We‘re excited to announce a new integration update that makes life much easier for teams using Birdview PSA for project management and QuickBooks for accounting and invoicing. With our latest update to QuickBooks integration, you can now export invoices created in Birdview PSA directly into QuickBooks–saving time, reducing manual work, and keeping your billing process smooth and accurate.
Why this matters
Birdview is where your work happens. Projects, tasks, time logs, job roles, billable hours–they all live in one place. And until now, getting that information into QuickBooks meant retyping everything manually.
Now? Just create your invoice in Birdview and export it to QuickBooks in a few clicks. No more switching tabs and copying data line by line.
-
🕒 Save hours of manual work – Stop entering the same data twice.
-
❌ Reduce errors – Keep everything consistent between systems.
-
💸 Get paid faster – Move from project work to invoice to payment without delay.
-
🎯 Stay focused – Let Birdview handle the details while you focus on your work.
How it works
Exporting invoices from Birdview to QuickBooks is quick and simple:
1. Connect your QuickBooks integration
Before you begin, make sure your Birdview account is connected to QuickBooks. You can find detailed instructions on how to set it up here.
2. Create an invoice in Birdview
Build your invoice using project data like tasks, roles, time logs, and more. For a full guide, check out this article.
3. Export the invoice to QuickBooks
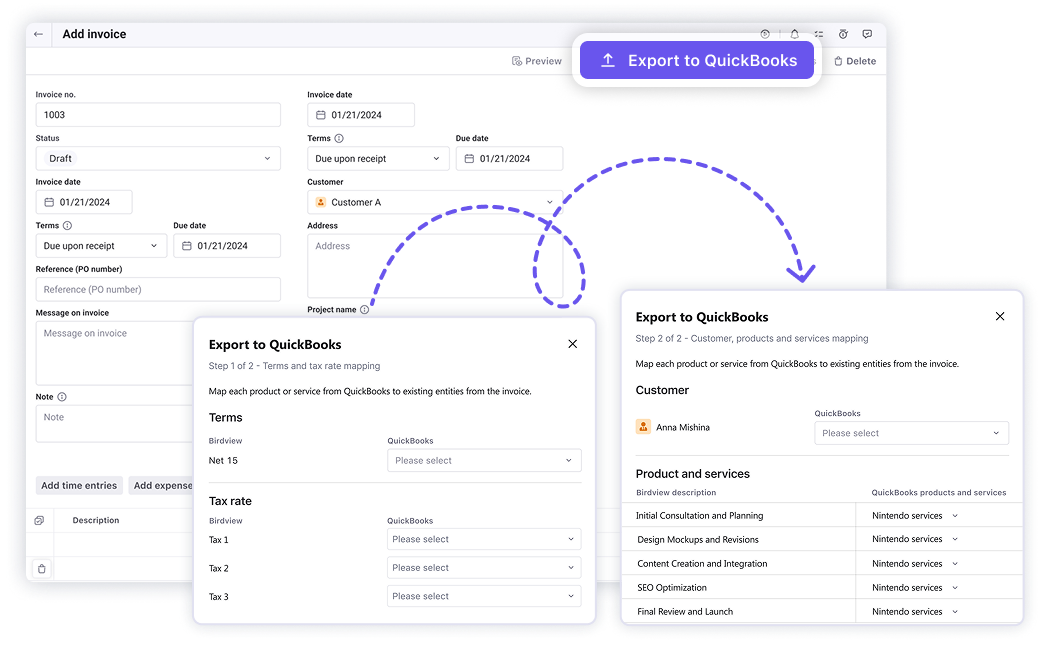
Once your invoice is saved, you’ll see the “Export to QuickBooks” button in the upper-right corner of the invoice window. Click it to start the export.
4. Map products and services
Match each product or service in QuickBooks with the corresponding details from your Birdview invoice. Start by selecting the payment terms and applicable tax rates, then click Continue.
5. Choose or create a customer
Select an existing customer from your QuickBooks list, or enter a name to create a new customer record directly from Birdview.
6. Finalize the export
Once everything is mapped and selected, click Export to complete the process. Your invoice will appear in QuickBooks–no manual input needed.